How To Create TR?
First login into SAP System and use T Code "se01".
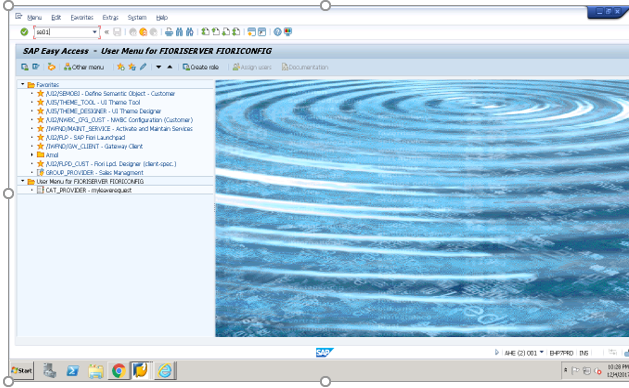 Press enter then you will get below screen.
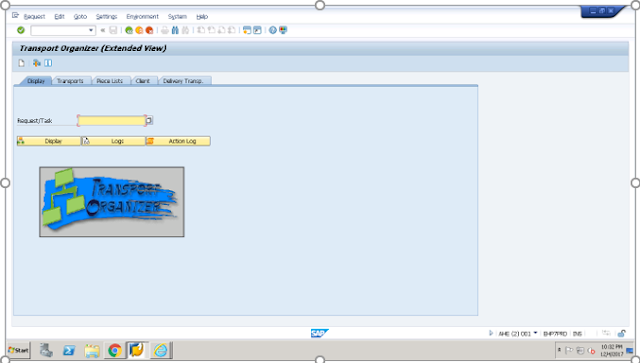
Click on create icon.I have shown in below screen.
 After that you will get below screen.
 Choose “customizing request” for Tile creation and “workbench request” for BSP application.
 Here I am choosing “workbench request”.
Press enter then you will get below screen.
Here I am choosing “workbench request”.
Press enter then you will get below screen.
 Write proper description
like“ModuleName_AppName_DeveloperName_fullDate”.
Write proper description
like“ModuleName_AppName_DeveloperName_fullDate”.
Module Name: testModule
App Name: empDis Press enter then you will get below screen.

Now TR has been created successfully.
How to display single TR?
First login into SAP System and use T Code "se01".
Press enter then you will get below screen.
Write your TR.I have shown in below screen.

 Click on "Display" button then you will get information about particular TR.

How to display all TR'S?
First login into SAP System and use T Code "se01".
Press enter then you will get below screen.
Click on "Transports" tab. I have shown in below screen.
 you will get below screen.
 Click on "Display" button then you will get below screen.
 If you want to get info about particular TR then click on plus(+) icon.

How to release TR?
First login into SAP System and use T Code "se01".
Press enter then you will get below screen.
Write your TR.I have shown in below screen.
 Click on "Display" button then you will get below screen.
 First select Task(sub) TR.I have shown in below screen.
 Click on truck symbol. I have shown in below screen.

Now your sub(Task) TR has been released successfully
and do same step for Main(workbench) TR.
How to create Package?
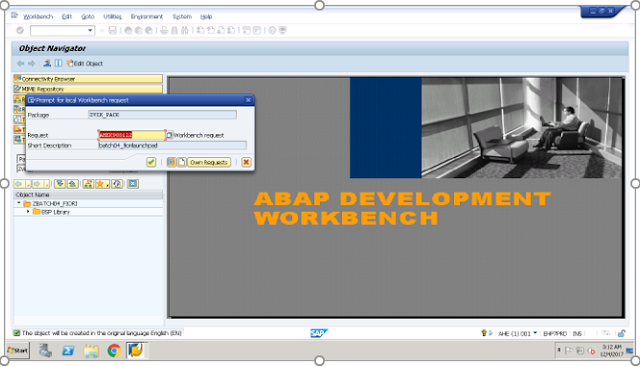
First login into SAP System and use T Code "se80".
 Press enter then you will get below screen.
 If you want to create your package then write name starting with
either 'y' or 'z'.
write your package name. I have shown in below screen.
 I am writing package name 'zvik_pack'.
After writing package name
Press enter then you will get below screen.
 Click on 'Yes' then you will get below screen.
 Write description.I have written.
'my new package'
I have shown in below screen.
 Press enter then you will get below screen.
 Write your created Main TR.
I have shown in below screen.
 Press enter then you will get below screen.

Now your Package has been created successfully.
How to upload application into package?
First login into SAP System and use T Code "se38".
 press enter then you will get below screen.
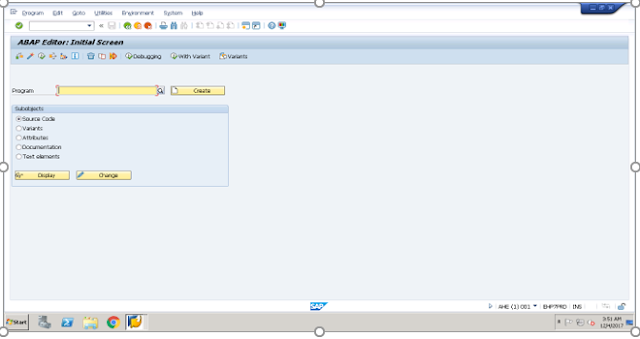 Select “/UI5/UI5_REPOSITORY_LOAD” from program’s F4 help.
 Execute.I have shown in below screen.
 You will get below screen.
 Write Upload name.
I have written.
"ZES4TESTTTT"(write name starting with either 'z'or'y')
Write Upload name.
I have written.
"ZES4TESTTTT"(write name starting with either 'z'or'y')
 Execute.I have shown in below screen.
 You will get below screen.
 Select your application.
 Click on "OK" then you will get below screen.
 Click on "Click here to upload" then you will get below screen.
 Write details
 Press enter then application will be uploaded to your package.
Note: If popup will come then allow it.
Use T Code(se80) to see your uploaded application.

Fiori Launchpad Configuration
Step 1: Register your application
Note- If you have already launchpad then no need to create again.You have to just register your applications inside the launchpad.
Create a Launchpad
First login into SAP System and use T Code "LPD_CUST".
 Press enter then you will get below screen.
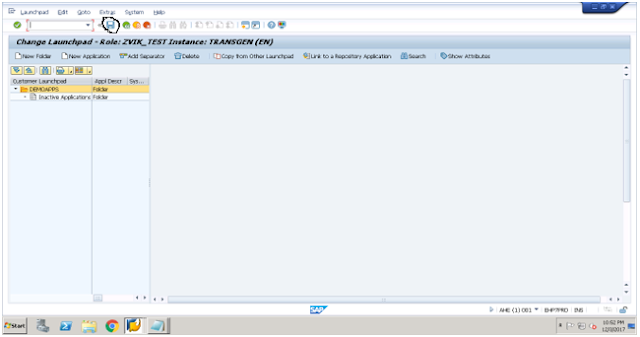
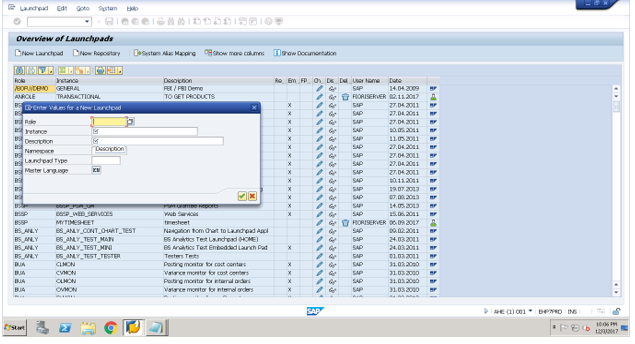
 Click on "New Launchpad".I have shown in below screen.
 You will get below screen.
 Write details:
Role: ZVIK_TEST(you can write any thing)
Instance: Transgen(you can write any thing)
Description: DEMOAPPS(
Note: Namespace and Launchpad Type are optional but if
you do not write Namespace then one popup will come and you have to
select either "Yes" or "No".
 Press enter then you will get below screen.
 Click on save button.I have shown in below screen.
Now Launchpad has been created successfully.
Click on back button.I have shown in below screen.
 You will get below screen.
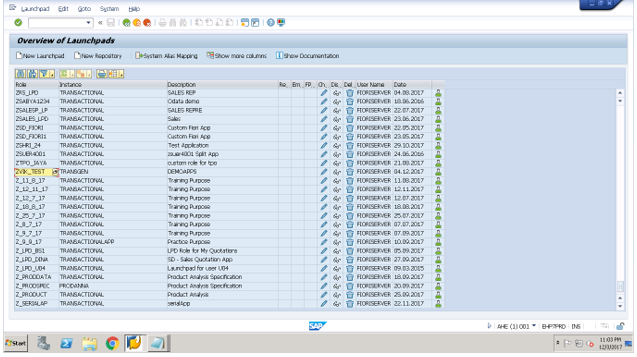
 Click on find button.I have shown in below screen.
 You will get below screen.
 Write the text.
"ZVIK_TEST"
Write the text.
"ZVIK_TEST"
 Press enter then you will get your created launchpad.
 Step 1: Register your application
Add target applications
Click on your created launchpad.I have shown in below screen.
 you will get below screen.
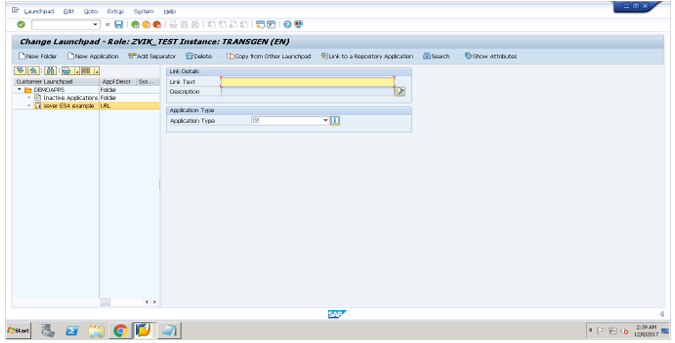
 Click on "New Application".I have shown in below screen.
 You will get below screen.
 Link Test=write free text related to your application.
I have written.
Link Test ="Test Master Application".
 Select URL option from Application Type.
 Click on edit button icon in the Application Parameter section.
 Write full path to access the application in the text area.
E.G
/sap/bc/ui5_ui5/sap/”your upload name of BSP application”.
/sap/bc/ui5_ui5/sap/ZMASTER
 Click on "Show Advanced(Optional) Parameters".
 Click on edit button icon.I have shown in below screen.

You will get below screen.
 Write free text related to your application in the text area.
I have written.
Application Alias =‘MasterApp’.
Write free text related to your application in the text area.
I have written.
Application Alias =‘MasterApp’. Write component name in Additional Information.
E.G
Click on save button. I have shown in below screen. You will get the list in left hand side. I have shown in below screen.
Now Application has been added to launchpad.
Step 2: Create Customizing TR
Step 3: Logon to the Launchpad Designer
(host name will be varied)
(path will be same everywhere)
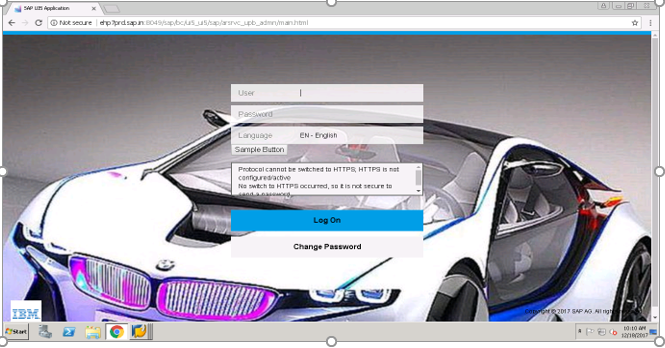
paste URL in browser and enter.You will get below screen.
 Enter User,Password and login.You will get below screen.
 Click on setting icon.I have shown in below screen.
 You will get below screen.
 Select your created customizing TR from the options.

 Click on OK.You will get below screen.

Step 4: Create Catalog
Click on plus icon.I have shown in below screen.
 You will get below screen.
 Provide Title and Id.You can write anything.
I have written.
Title :"Test Master"
Id: "ZTest_master" Click on Save.You will get below screen.

Now Catalog has been created successfully.
Step 5: Add tile to catalog
Select your created catalog.
Click on plus icon.I have shown in below screen.
 You will get below screen.
 Select app launcher#static tile.
Click on tile.I have shown in below screen.
Select app launcher#static tile.
Click on tile.I have shown in below screen.
 You will get below screen.
 Click on created tile.I have shown in below screen.
 You will get below screen.

 Provide details.You can give anything.
I have given.
Provide details.You can give anything.
I have given.
Title:"Mock Master"
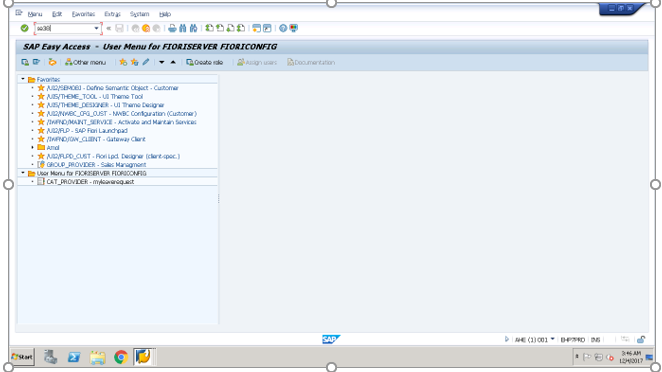
Create semantic object
T Code (/n/ui2/semobj) Press enter.You will get below screen.
 Click on edit icon.I have shown in below screen.
 If popup comes then press enter.
You will get below screen.
If popup comes then press enter.
You will get below screen.
 Click on New Entries.I have shown in below screen.
 You will get below screen.
 Provide details.You can write anything.
I have given.
Semantic Objcet:"ZtestMaster"
Semantic Object Name:"test Mock Master"
Semantic Object description:"test mock semantic object"
 Click on save icon.I have shown in below screen.
 You will get below screen.
Provide TR.
 Press enter.
Now your Semantic Object has been created successfully.
Go to your browser where you opened Launchpad designer and refresh it.
Select Semantic Object from F4 that has been already created.
 Action:"testMaster" (Write action related to your application).
 Click on save button.You will get below screen.
 Click on Ok button.You will get below screen.
 Now Tile has been added to catalog successfully.
Select Target Mapping tab.You will get below screen.
 Click on Create Target Mapping button.I have shown in below screen.
 You will get below screen.

 Select your created semantic object.
Provide same Action as previous.
For Launchpad Role, Launchpad Instance , Application Alias
T code(LPD_CUST)
 Press enter.You will get below screen.
 Select your created launchpad.I have shown in below screen.
 Click on it. You will get below screen.
 Launchpad Role:"ZVIK_TEST"
Launchpad Instance:"TRANSGEN"
Launchpad Role:"ZVIK_TEST"
Launchpad Instance:"TRANSGEN" Application alias:"MasterApp"
 Click on Save button.You will get below screen.
 Click on Ok button.You will get below screen.

Now Target Mapping done successfully.
Step 6: Create Group
Select groups tab then click on plus icon.
I have shown in below screen.
 You will get below screen
 Provide details.
I have given.
Title:"Test Mas-Det"
Id: "ZTest_mastergrp"
 Click on Save button.
 Now group has been created successfully.
Step 7: Add tile to group
Click on plus icon.I have shown in below screen.
 You will get screen.
 Select your created catalog from F4.
 You will get below screen.
 Click on plus icon.


Now tile has been added to group.
Step 8: Create Role
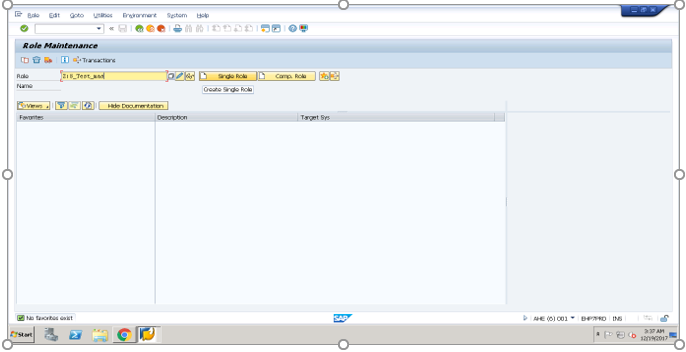
First login into SAP System and use T Code "PFCG".
 Press enter.You will get below screen.
 Write role.
I have written.
Role:"Z:S_Test_mas"
 Click on Single Role.I have shown in below screen.
 You will get below screen.
 Write description.
I have written.
Description: "single role for Master Application".
Write description.
I have written.
Description: "single role for Master Application". Click on Save icon.I have shown in below screen.
 You will get below screen.
 Now Role has been created successfully.
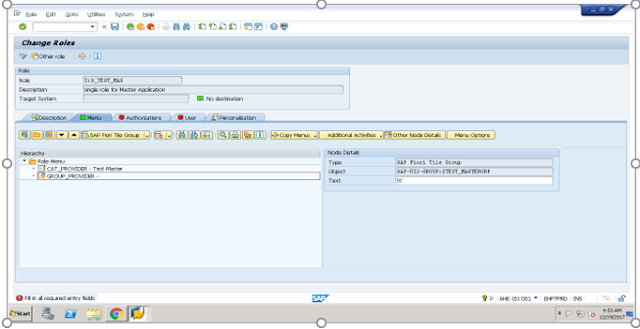
Assign Catalog to created role.
Select Menu Tab. I have shown in below screen.
 You will get below screen.
 Click on circled area.I have shown in below screen.
 You will get below screen.
 Select "SAP Fiori Tile Catalog" from options.
 Provide Catalog ID that already has been created.
Catalog ID:" ZTest_master"
Provide Catalog ID that already has been created.
Catalog ID:" ZTest_master" Press enter.You will get below screen.
 Now Catalog has been assigned successfully to role.
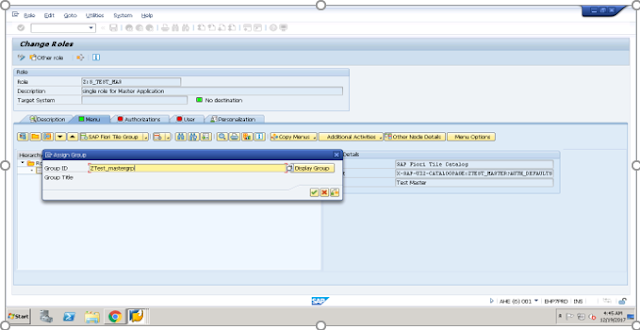
Assign Group to created role.
Select "SAP Fiori Tile group" from options. Provide Group ID that already has been created.
Group ID:" ZTest_mastergrp"
Provide Group ID that already has been created.
Group ID:" ZTest_mastergrp"
 Press enter.You will get below screen.
 Enter free text. I have shown in below screen.
 Now Group has been assigned successfully to role.
Assign user to role.
Select User tab.I have shown in below screen.
 You will get below screen.
 Enter user name to whom you want to display catalog and group on launchpad.
 Press enter.You will get below screen.
 Click on Save icon.I have shown in below screen.
 You will get below screen.
 Now user has been assigned successfully to role.
Now this user can see assigned catalog and group on launchpad.
Step 9: Open Launchpad
URL: http://ehp7prd.sap.in:8049/sap/bc/ui5_ui5/ui2/ushell/shells/abap/Fiorilaunchpad.html
"http://ehp7prd.sap.in:8049"
(host name will be varied)
"/sap/bc/ui5_ui5/ui2/ushell/shells/abap/Fiorilaunchpad.html"
(path will be same everywhere)
paste URL in browser and enter.You will get below screen.
 Enter User ID and Password.
 Login then you will get below screen.
See your created catalog
Click on menu icon.I have shown in below screen.
 You will get below screen.

Click on Tile Catalog button.You will get below screen. Select your created catalog from options.
 If you will click on tile then targeted application will be opened.
See your created Group
Select your created group.
 You will get below screen.
 If you will click on tile then targeted application will be opened.

Now FIORI Launchpad Configuration has been completed.
How To Create TR?
First login into SAP System and use T Code "se01".
Press enter then you will get below screen.
Click on create icon.I have shown in below screen.
Click on "Display" button then you will get information about particular TR.
First login into SAP System and use T Code "se01".


Click on create icon.I have shown in below screen.

After that you will get below screen.

Choose “customizing request” for Tile creation and “workbench request” for BSP application.

Here I am choosing “workbench request”.
Press enter then you will get below screen.

Write proper description
like“ModuleName_AppName_DeveloperName_fullDate”.
E.G.
Module Name: testModule
Module Name: testModule
App Name: empDis
Developer Name: vikas
Full Date: 04-12-2017
“testModule_empDis_vikas_04-12-2017”

Press enter then you will get below screen.

Now TR has been created successfully.
How to display single TR?
First login into SAP System and use T Code "se01".
Press enter then you will get below screen.
Write your TR.I have shown in below screen.


How to display all TR'S?
First login into SAP System and use T Code "se01".
Press enter then you will get below screen.
Click on "Transports" tab. I have shown in below screen.
Click on "Display" button then you will get below screen.
If you want to get info about particular TR then click on plus(+) icon.
How to release TR?
First login into SAP System and use T Code "se01".
Press enter then you will get below screen.

you will get below screen.


How to release TR?
First login into SAP System and use T Code "se01".
Press enter then you will get below screen.
Write your TR.I have shown in below screen.

Click on "Display" button then you will get below screen.

First select Task(sub) TR.I have shown in below screen.

Click on truck symbol. I have shown in below screen.

Now your sub(Task) TR has been released successfully
and do same step for Main(workbench) TR.
Note: Unclassified TR will not be released.
How to create Package?
First login into SAP System and use T Code "se80".
Press enter then you will get below screen.
If you want to create your package then write name starting with
either 'y' or 'z'.
write your package name. I have shown in below screen.
I am writing package name 'zvik_pack'.
After writing package name
Press enter then you will get below screen.
Click on 'Yes' then you will get below screen.
Write description.I have written.
'my new package'
I have shown in below screen.
Press enter then you will get below screen.
Write your created Main TR.
I have shown in below screen.
Press enter then you will get below screen.
Now your Package has been created successfully.
How to upload application into package?
First login into SAP System and use T Code "se38".
press enter then you will get below screen.
How to create Package?
First login into SAP System and use T Code "se80".


either 'y' or 'z'.
write your package name. I have shown in below screen.

After writing package name
Press enter then you will get below screen.


'my new package'
I have shown in below screen.


I have shown in below screen.


Now your Package has been created successfully.
How to upload application into package?
First login into SAP System and use T Code "se38".

Select “/UI5/UI5_REPOSITORY_LOAD” from program’s F4 help.

Execute.I have shown in below screen.

You will get below screen.

Write Upload name.
I have written.
"ZES4TESTTTT"(write name starting with either 'z'or'y')

Execute.I have shown in below screen.
You will get below screen.
Select your application.
Click on "OK" then you will get below screen.
Click on "Click here to upload" then you will get below screen.
Write details


Description: ES4 server test(free text related to app)
Package: ZVIK_PACK(your package name)
Transport Request: AHEK900177(your created TR)
External Codepage: cp1252(same)
Press enter then application will be uploaded to your package.
Note: If popup will come then allow it.
Use T Code(se80) to see your uploaded application.

Fiori Launchpad Configuration
Step 1: Register your application
Note- If you have already launchpad then no need to create again.You have to just register your applications inside the launchpad.
Create a Launchpad
First login into SAP System and use T Code "LPD_CUST".
Press enter then you will get below screen.
Click on "New Launchpad".I have shown in below screen.
You will get below screen.
Write details:
Role: ZVIK_TEST(you can write any thing)
Add target applications
Click on your created launchpad.I have shown in below screen.
you will get below screen.
Click on "New Application".I have shown in below screen.
You will get below screen.
Link Test=write free text related to your application.
I have written.
Link Test ="Test Master Application".
Select URL option from Application Type.
Click on edit button icon in the Application Parameter section.
Write full path to access the application in the text area.
E.G
Step 1: Register your application
Note- If you have already launchpad then no need to create again.You have to just register your applications inside the launchpad.
Create a Launchpad
First login into SAP System and use T Code "LPD_CUST".


Role: ZVIK_TEST(you can write any thing)
Instance: Transgen(you can write any thing)
Description: DEMOAPPS(
Namespace: z
Note: Namespace and Launchpad Type are optional but if
you do not write Namespace then one popup will come and you have to
select either "Yes" or "No".

Press enter then you will get below screen.

Click on save button.I have shown in below screen.

Now Launchpad has been created successfully.
Click on back button.I have shown in below screen.

You will get below screen.

Click on find button.I have shown in below screen.

You will get below screen.

Write the text.
"ZVIK_TEST"

Press enter then you will get your created launchpad.
Step 1: Register your application
Add target applications
Click on your created launchpad.I have shown in below screen.


I have written.
Link Test ="Test Master Application".


E.G
/sap/bc/ui5_ui5/sap/”your upload name of BSP application”.
My BSP application’s upload name is “ZMASTER”.
/sap/bc/ui5_ui5/sap/ZMASTER

Click on "Show Advanced(Optional) Parameters".

Click on edit button icon.I have shown in below screen.

You will get below screen.

Write free text related to your application in the text area.
I have written.
Application Alias =‘MasterApp’.

Write component name in Additional Information.
SAPUI5.Component=component name of your application
E.G
SAPUI5.Component=MasterDetail
Click on save button. I have shown in below screen.

You will get the list in left hand side. I have shown in below screen.

Now Application has been added to launchpad.
Step 2: Create Customizing TR
Step 3: Logon to the Launchpad Designer
Click on OK.You will get below screen.
Step 4: Create Catalog
Provide Title and Id.You can write anything.
I have written.
Title :"Test Master"
Step 2: Create Customizing TR
Step 3: Logon to the Launchpad Designer
(host name will be varied)
(path will be same everywhere)
paste URL in browser and enter.You will get below screen.
Enter User,Password and login.You will get below screen.

Click on setting icon.I have shown in below screen.

You will get below screen.

Select your created customizing TR from the options.


Step 4: Create Catalog
Click on plus icon.I have shown in below screen.

You will get below screen.

I have written.
Title :"Test Master"
Id: "ZTest_master"

Click on Save.You will get below screen.

Now Catalog has been created successfully.
Step 5: Add tile to catalog
Select your created catalog.
Click on plus icon.I have shown in below screen.

You will get below screen.

Select app launcher#static tile.
Click on tile.I have shown in below screen.

You will get below screen.

Click on created tile.I have shown in below screen.

You will get below screen.


Provide details.You can give anything.
I have given.
Title:"Mock Master"
Keywords :"Master","Mock" (it helps in searching the tile)
Icon : select icon from F4
Create semantic object
T Code (/n/ui2/semobj)

Press enter.You will get below screen.

Click on edit icon.I have shown in below screen.

If popup comes then press enter.
You will get below screen.
Click on New Entries.I have shown in below screen.
You will get below screen.
Provide details.You can write anything.
I have given.
Semantic Objcet:"ZtestMaster"


I have given.
Semantic Objcet:"ZtestMaster"
Semantic Object Name:"test Mock Master"
Semantic Object description:"test mock semantic object"
Semantic Object description:"test mock semantic object"

Click on save icon.I have shown in below screen.

You will get below screen.
Provide TR.

Press enter.
Now your Semantic Object has been created successfully.
Go to your browser where you opened Launchpad designer and refresh it.
Select Semantic Object from F4 that has been already created.

Action:"testMaster" (Write action related to your application).

Click on save button.You will get below screen.
Click on Ok button.You will get below screen.
Now Tile has been added to catalog successfully.
Select Target Mapping tab.You will get below screen.
Click on Create Target Mapping button.I have shown in below screen.
You will get below screen.
Select your created semantic object.
Provide same Action as previous.
For Launchpad Role, Launchpad Instance , Application Alias
Press enter.You will get below screen.
Select your created launchpad.I have shown in below screen.


Select Target Mapping tab.You will get below screen.


Provide same Action as previous.
For Launchpad Role, Launchpad Instance , Application Alias
T code(LPD_CUST)

 Select your created launchpad.I have shown in below screen.
Click on it. You will get below screen.

Launchpad Role:"ZVIK_TEST"
Launchpad Instance:"TRANSGEN"

Application alias:"MasterApp"

Click on Save button.You will get below screen.

Click on Ok button.You will get below screen.

Now Target Mapping done successfully.
Step 6: Create Group
Select groups tab then click on plus icon.
I have shown in below screen.
You will get below screen
Provide details.
I have given.
Title:"Test Mas-Det"
Id: "ZTest_mastergrp"
Click on Save button.
Now group has been created successfully.
Step 7: Add tile to group
Click on plus icon.I have shown in below screen.
You will get screen.
Select your created catalog from F4.
You will get below screen.
Click on plus icon.
Now tile has been added to group.
Step 8: Create Role
First login into SAP System and use T Code "PFCG".
Press enter.You will get below screen.
Write role.
I have written.
Role:"Z:S_Test_mas"
Click on Single Role.I have shown in below screen.
You will get below screen.
Assign Catalog to created role.
Select groups tab then click on plus icon.
I have shown in below screen.


I have given.
Title:"Test Mas-Det"
Id: "ZTest_mastergrp"


Step 7: Add tile to group
Click on plus icon.I have shown in below screen.


Now tile has been added to group.
Step 8: Create Role
First login into SAP System and use T Code "PFCG".


I have written.
Role:"Z:S_Test_mas"


Write description.
I have written.
Description: "single role for Master Application".

Click on Save icon.I have shown in below screen.

You will get below screen.

Now Role has been created successfully.
Assign Catalog to created role.
Select Menu Tab. I have shown in below screen.

You will get below screen.
Click on circled area.I have shown in below screen.


You will get below screen.

Select "SAP Fiori Tile Catalog" from options.
You will get below screen.

Provide Catalog ID that already has been created.
Catalog ID:" ZTest_master"

Press enter.You will get below screen.

Now Catalog has been assigned successfully to role.
Assign Group to created role.
Select "SAP Fiori Tile group" from options.
Assign Group to created role.
Select "SAP Fiori Tile group" from options.

Provide Group ID that already has been created.
Group ID:" ZTest_mastergrp"

Press enter.You will get below screen.

Enter free text. I have shown in below screen.


Now Group has been assigned successfully to role.
Assign user to role.
Select User tab.I have shown in below screen.
Assign user to role.
Select User tab.I have shown in below screen.

You will get below screen.

Enter user name to whom you want to display catalog and group on launchpad.

Press enter.You will get below screen.

Click on Save icon.I have shown in below screen.

You will get below screen.

Now user has been assigned successfully to role.
Now this user can see assigned catalog and group on launchpad.
Step 9: Open Launchpad
URL: http://ehp7prd.sap.in:8049/sap/bc/ui5_ui5/ui2/ushell/shells/abap/Fiorilaunchpad.html
See your created catalog
Click on menu icon.I have shown in below screen.
You will get below screen.
Now this user can see assigned catalog and group on launchpad.
Step 9: Open Launchpad
URL: http://ehp7prd.sap.in:8049/sap/bc/ui5_ui5/ui2/ushell/shells/abap/Fiorilaunchpad.html
"http://ehp7prd.sap.in:8049"
(host name will be varied)
"/sap/bc/ui5_ui5/ui2/ushell/shells/abap/Fiorilaunchpad.html"
(path will be same everywhere)
paste URL in browser and enter.You will get below screen.

Enter User ID and Password.

Login then you will get below screen.

See your created catalog
Click on menu icon.I have shown in below screen.


Click on Tile Catalog button.You will get below screen.

Select your created catalog from options.


If you will click on tile then targeted application will be opened.

See your created Group
Select your created group.

You will get below screen.

If you will click on tile then targeted application will be opened.

Now FIORI Launchpad Configuration has been completed.
No comments:
Post a Comment